
If you’re a training provider who is new to using live online webinar to deliver your courses, then you might be looking for a guide to Zoom for training and some practical tips on how to best use the software. You’ve come to the right place!
While the Arlo training management system integrates with all video conferencing platforms, including GoToWebinar and Demio, we’re focusing on Zoom in this article because it’s our preferred platform for hosting. We’ve picked this solution because it’s secure, reliable, fairly priced and professional.
Zoom as you probably are aware, is one of the leading video conferencing tools on the market. It allows people to connect virtually from anywhere, across any device. This lends itself to running webinars and hosting online training perfectly for training providers. It’s super easy to use and you can get going in minutes.
In this article we’ll cover everything you need to know about Zoom for training; how to set-up a Zoom account, how to engage your audience with Zoom’s features, how the Arlo integration works seamlessly to deliver webinars, how to create a webinar in Zoom using Arlo, and how to create multi-session events.
5 key steps for using Zoom for training
How to set-up a Zoom Pro account
We recommend that hosts for Zoom meetings have at least a Pro account with Zoom, as only licensed (paid) Zoom users can be selected to be meeting hosts for events created in Arlo.
Zoom’s Pro account is the next step up from the free Basic account, and cheaper than the Business or Enterprise plans. The Pro account gives you unlimited group meetings, with up to 100 participants, social media streaming, 1GB cloud recording, and up to 9 purchasable licenses. For $149.90 per year.
To create a Pro account:
- Go to zoom.us
- Choose monthly or annual subscription, and any available add-ons.
- Select your date of birth, and create your account using your name and email address (preferably the same address you use with arlo.co for simplicity)
- Add your payment method
- Download the Zoom desktop application (you can stick with the web browser, but it does have limited functionality).
Your Pro account is set-up and ready to go!
Once you’re logged in it’s worth familiarizing yourself with the options in your account and choosing your default settings. Check out Zoom’s quick start guide for new users.
Once you’ve started your meeting, as a host, you’ll notice a number of settings on your toolbar:
- Mute/Unmute: Toggle this on and off to control your audio
- Start/Stop Video: Toggle this on and off to control your video
- Invite: Is someone having difficulty joining the meeting? You can re-send them the meeting link using this button.
- Manage Participants: This allows you to unmute/mute people or message people one on one.
- Share: Share your screen, your whiteboard, or access annotation features during the meeting.
- Chat: Access the group chat function.
- Record: Record the meeting (you can choose to save this as a “local recording” to your own computer, or as a “cloud recording” which will save to your Zoom account).
- End Meeting: As the host, make sure to “End Meeting for all” once the meeting is over.
Ultimate Guide to Webinars for Training Providers
Find everything you need to master webinars for your training organization in this comprehensive guide.

Tips for engaging your audience with Zoom
Zoom easily allows you to create connected environments from anywhere. Zoom has a suite of features that allow you to create highly engaging online environments for your registrants to learn. Emulate classroom breakout sessions in Zoom. Allow small groups of participants to work on a topic, then pull everyone together and share the results. Use virtual whiteboards and chat messaging to facilitate the interactions.
Here are five great features to use to engage your audience, with steps on how to set them up in Zoom.
Breakout rooms – as the presenter you can split people into virtual breakout groups (up to 50 separate sessions) and then go back and forth between them, just as you would in a real classroom environment.
Read more on how to create breakout rooms.
Virtual whiteboards – as a presenter you can share a whiteboard with the attendees, and even allow them to write on the whiteboard too. With this tool, you can draw, write text, or brainstorm together.
For participants to use the whiteboard, you will need to invite participants to “Annotate.” Then, participants will click “View Options” and “Annotate.”
Read more on how to share a virtual whiteboard.
Chat – use the chat feature to send a private message to an individual user, or you can send a message to an entire group. As the host, you can choose who the participants can chat with. For example, they can chat with the host only or everyone publicly, or everyone publicly and privately, or disable the chat function entirely. Use the chat feature to ask attendees to post their questions to be answered live during the webinar, to share important links and additional information, or even to share files.
Read more on how to use Zoom’s chat feature.
Polls – this is an awesome feature that allows you to create single or multiple choice polling questions for your audience to answer live. Throughout your webinar, you can run polls asking questions relating to the topic you’ve talked about, to gauge how much your audience is paying attention and how much they’re learning.
For example, you can run quiz polls on the topic of your webinar, or ask them on a scale of 1-10 how confident they’re feeling about their knowledge of the content in the presentation so far.
At the end of the webinar, you can download a report of the poll.
Read more on how to use Zoom’s poll feature.
Guide to Zoom integration with Arlo
Many of our customers are using our native Arlo integration with Zoom – to combine the webinar software with the Arlo Training Management System to help you sell more.
To connect Arlo to Zoom:
- In Arlo, open the settings menu
- Select Zoom
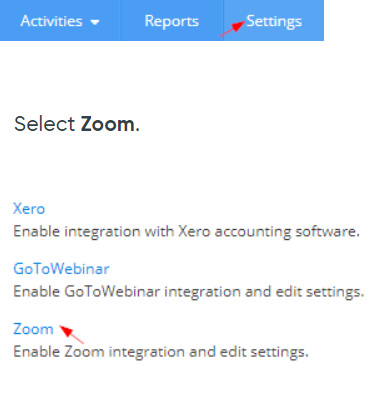
3. Press Connect to Zoom
4. Login to Zoom
5. Press authorize.
The integration is as easy as that to set-up in your Arlo account yourself. Alternatively our support team will get the integration hooked up for you for free. Once set-up, the two systems will work together seamlessly – automatically sending data to and from each other.
How to create a webinar in Zoom using Arlo
Once it’s set-up, it’s intuitively easy to use Arlo and Zoom together! Just create the webinar in Arlo, including the date and time, and Arlo will then use these details to create the Zoom meeting, including automatically adding presenters and support staff to the webinar. These details will be sent to registrants along with the webinar join link and webinar instruction emails.
Check out our support article on creating a webinar in Zoom. Or check out our Zoom troubleshooting and facts support article.
How to create multi-session events
Multi-session enables the creation of courses that are split into multiple sessions (eg. 6x 1hr live online webinars). Have a choice of sessions (optional or mandatory as required). Have a mixture of delivery methods (at a venue or live online), different presenters, or different prices – including optional extras. These multi-session courses can be run over a number of weeks. Registrants on these courses will be automatically registered for all mandatory sessions, and any optional sessions that they choose to attend.
For more information on how to create multi-session courses in Arlo, check out our support article.
Zoom for training FAQs
Yes. If you have one more than one presenter for your training course, the host can designate anyone to be a co-host during the meeting, which gives them the same privileges of the host.
Not at this stage. We recommend you leave the host and assign a different person as the presenter if you need to change who will be responsible for managing the meeting.
The default dial-in countries can be specified at user, group, or account level within your Zoom account.
Learn how to Specify Default Dial-in Countries in Zoom.
Yes. If you edit or cancel an event in Arlo, the associated Zoom meeting will also be edited or cancelled.
No, you cannot change an event that has been approved as a Custom URL event to a Zoom meeting. This is to prevent registrants from receiving duplicate or contradictory communications.
You can add the information for the Zoom meeting into the available fields in the Custom URL schedule.
Zoom’s Pro account is the next step up from the free Basic account, and cheaper than the Business or Enterprise plans. The Pro account gives you unlimited group meetings, with up to 100 participants, social media streaming, 1GB cloud recording, and up to 9 purchasable licenses. For $149.90 per year.
Although we recommend Zoom for webinar hosting, it’s always important for your own business to assess each webinar tool against your requirements to ensure you’ve picked the right solution for you.
For more information on how to master webinars for your training organization, check out the Ultimate Guide to Webinars for Training Providers.