Skift Take
We surveyed 1,500 event professionals and the majority agree that engaging Attendees is the most crucial element of planning experiences. Event professionals do often a good job at engaging attendees live but what about the army of online attendees?
Live streaming can add that tech element to your event and create an interactive platform that leaves your audience engaged and entertained, while offering additional revenue streams.
In this post, we’ll show you how to set up live streaming for your event and run streams on different social media apps!
What is Live Streaming?
Definition
Live streaming is the broadcasting of real-time video to an audience over the internet.
It is an extension of video marketing, and it’s rapidly becoming the preferred marketing channel for most brands and event planners because of its ability to increase user engagement and audience reach.
This approach to video content marketing makes visuals more interactive and appealing to your target audience and provides higher social media engagements.
So, let’s see why live streams are an important inclusion to your event:
Live Streaming Saves Cost and Increases ROI
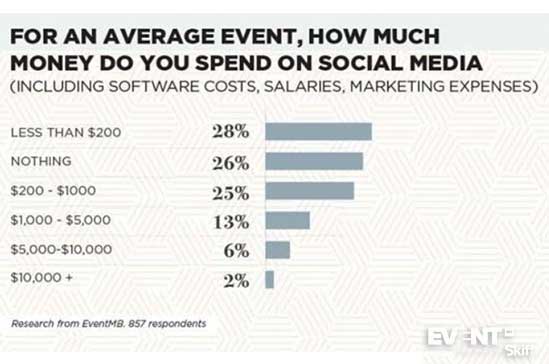
When compared with SEO and other forms of content marketing for events, live streaming is cost-effective in implementation. Data even shows that 25% of event marketers spend between $200 and $1000 for an average event on social media, while 28% spend below $200 and 26% spend nothing.
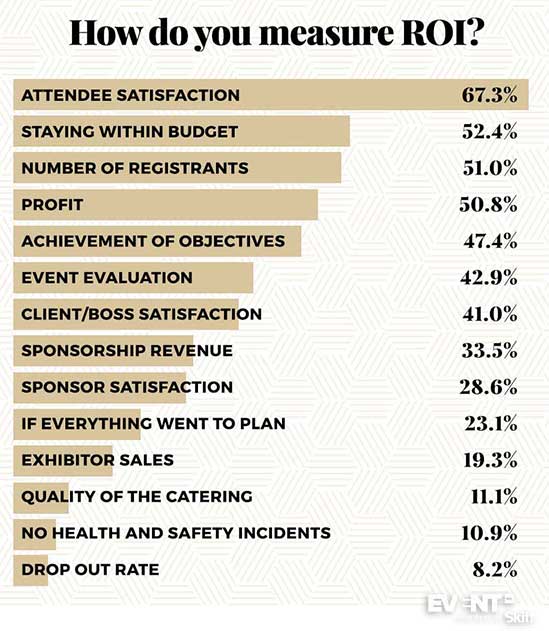
This contributes to a positive return on investment (ROI) as 67% of event organizers measure ROI based on audience satisfaction. And what better way to satisfy your remote audience than giving them a front-row view of the event?
It Increases User Engagement
Remote audiences find live videos appealing because live streams give them access to content they might not otherwise have, and they can comment and interact with each other and your content in different ways. This helps to create a community.
In fact, 13% of event planners use social media as an avenue for viewers to interact with speakers during educational sessions.
When live streaming, you can enable real-time comments and this will allow speakers and presenters to ask and answer questions from the remote audience.
And when people appreciate your live videos on social media platforms, they also share it (and the recorded versions) with their friends, which increases brand awareness.
How to Set up Live Streaming at Your Event
There are many crucial elements to setting up a live stream at your event, and it can get confusing figuring out what specific requirements you should cover to make the process a smooth one.
But it isn’t that hard; don’t be discouraged.
The first thing you’d need to do is determine your live streaming needs.
What kind of event will you be streaming? Is it a small seminar? A product launch? Or an organizational milestone event?
Your specific live streaming needs will tell you the broadcasting camera setup and equipment required for the best results.
Basic Level
The fastest, easiest way to get your event live is to use gadgets you already have. And if you’re just dipping your toes into the waters of live streaming or your event is a small one, these requirements are what you’d want to consider.
At the basic level, you’ve got two options:
Set up with a WiFi Camera
Set up with a Single HD camera
WIFI CAMERA REQUIREMENTS
This basic single WiFi camera setup allows you to easily connect to the web and you can stream your event directly to YouTube, Instagram, Facebook and other social network platforms via your installed applications.
This type of setup is for extremely small events as it comes with certain obvious limitations, like poor video quality and plain, continuous recordings.
Here’s what you’ll need:
- Tripod (optional)
- WiFi connection (use a separate WiFi connection from the one used by attendees or the venue to ensure smooth streaming)
- Tablet, WiFi camera, smartphone camera
- Wide-angle lens
- Microphone
- Phone grip
- Lights
SINGLE HD CAMERA REQUIREMENTS
Even at the basic level, if you are going for a higher-quality looking stream at your event, you’ll need to invest in a professional video camera that captures and streams at high resolutions through an encoder.
Ensure you get dedicated video cameras that are manufactured for prolonged use. DSLRs usually aren’t. However, you don’t have to break the bank spending thousands on high-end camcorders either.
That said, if you’ve used camcorders previously (or at least know your way around one and intend to use it frequently), then they’d be a great choice.
It’s always best practice to opt for a standalone camera that can capture and stream your small events on the web.
Here’s what you’ll need:
- Tripod with both rounded and spike legs
- Video encoder
- Camcorder or HD video camera
- Portable WiFi device
BANDWIDTH REQUIREMENTS
Connection is crucial for both types of basic levels, so ensure you have a great data plan, full LTE bars, or a powerful WiFi signal if you’re relying on the venue. When it comes to live-streaming, what you should look at is your upload speed, which depends on your internet bandwidth and the amount of data you’re streaming determined by your video stream’s resolution and rate of frames per second. video file size
These two factors essentially determine your content quality. Your resolution determines how clear the image is, and your frames per second determine how smooth the video is. At this level, it’s a safe move to have an upload speed of 3 Mbps for a resolution of 480 pixels at 30 frames per second (or ‘480p30’) as you’ll most likely be working around that resolution with the gadgets mentioned above. Your minimum upload speed should be 600 kbps.
STEPS FOR IMPLEMENTING BASIC LIVE STREAMING
So in summary here are the steps you’ll need to cover:
Step 1. Mount your smartphone or single HD camera on a tripod.
Step 2. Connect your camera to a quality audio source other than its internal mic.
Step 3. Use a video encoder if you’re going for the single-camera option.
Step 4. Ensure your Internet connection matches up with the video quality of your camera.
Note
Avoid zooming in if you’re using a smartphone as it could undermine the picture quality.
ADDITIONAL TIPS
-
Speak to your WiFi provider for the correct info on your upload speed to ensure it matches up with the camera quality you’re using. To confirm onsite, you can use a number of free web services. In fact, if you just Google “test internet speed,” you can probably run a test right from the search results. The HD single camera would most likely capture at a resolution of 1080p, so you want a 13 Mbps upload speed.
-
Your camera at this level would probably be stationary and pointed at a particular object (podium, conference room, field, etc.) or have very limited movement. Advise your speakers of this to ensure they remain in the frame as they move around the stage.
Intermediate Level
If your event is in a large venue, you’ll need more than a single HD camera and additional video production hardware. You’d also require other devices that will assist video and audio signals for web broadcast.
With multiple cameras, you’ll be capable of capturing video from different angles of the venue and performers (from up close and afar) for more engaging content.
We’ll get into it more in a minute, but the live streaming setup broadly involves the following:
- Connecting your video sources to the encoder
- Setting up your layouts (scenes) for switching
- Configuring encoder and live streaming destination settings
- Setting up a connection between the encoder and live stream destination
Before we get into the details, it’s important to state that the encoder user interface and broadcast destination will differ from case to case depending on what streaming platforms, software, and hardware you’re using, but the structural workflow stays the same.
In the example below, we’ll use a Youtube user interface for the stream destination and Pearl-2 user interface for the encoder.
Video and Audio Connection
Connect your video and audio source to the encoder. Avoid using battery power. Rather, use AC power whenever possible for every device, especially your cameras. Next, place your camera on a tripod for better control and a steadier video during the event.
If you decide to use computer software for encoding, you’ll need to use a capture card, but if you’re using hardware encoders, that won’t be necessary.
Encoder Configuration
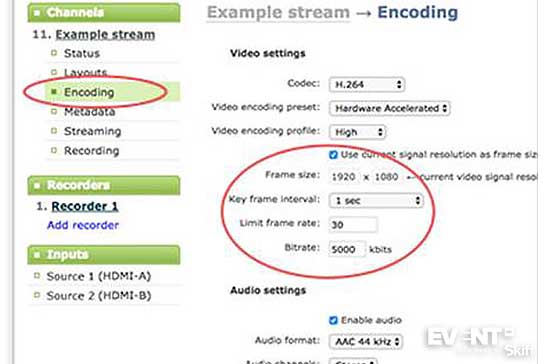
If you intend to switch between multiple cameras or sources, you need to prepare your scenes (layouts). Then, configure the most crucial streaming settings: bitrate, frame rate, and resolution.
If you aren’t sure, start with an automatic or 3000 kbps bitrate, 20 frames per second rate, and 1280 pixel × 720 pixel resolution.
You can leave everything else at its default setting. If you’re using software like OBS, you can configure all these settings on your computer. If you’re using a hardware encoder, you’ll have to access its settings through an app or web user interface.
CDN Live Stream Settings Configuration
Sign in to your live stream broadcast platform (CDN) and create a live streaming event. Set up your privacy settings, stream description, etc.
Get and copy your stream key/name and URL and paste it into the encoder. This is how you’ll link your encoder to your streaming platform.
For the CDN to know where to find video data it needs to verify and link up with the encoder. And the encoder needs to know where it should transmit the data to.
The entire process is done by using a password shared between both the encoder and the CDN, termed a stream key or stream name. You can get the stream key from your chosen streaming app or platform. Also, keep the key safe as anyone who has access to it can stream from your app profile.
To find the stream key and URL you can check your CDN’s encoder or advanced setting tabs.
Copy your stream URL that usually looks like a website address as well as your steam key and insert them into their respective fields in the user interface of your encoder.
You can then save and apply your changes.
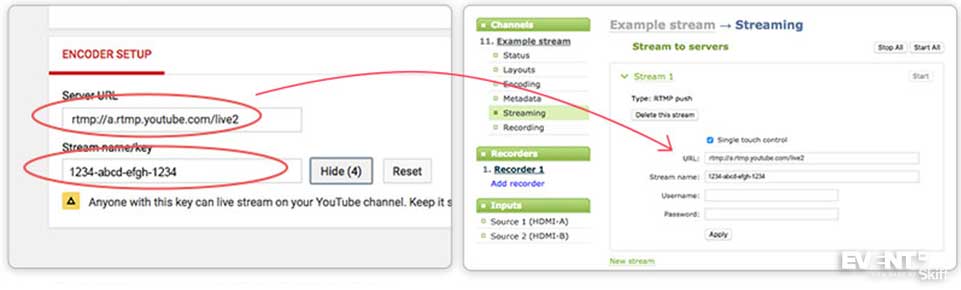
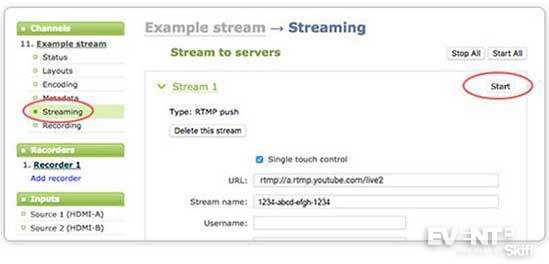
Go live by clicking “start streaming” on your encoder.
Once you hit start streaming on your encoder user interface, you should see a receiving signal notification on the CDN preview window. There will usually be a lag of 10 to 30 seconds between the live stream on the CDN and the encoder.
You can control live switching via the encoder user interface. Keep in mind that when you’re done you’ll have to stop streaming on the encoder UI as well.
INTERMEDIATE SETUP REQUIREMENTS
Here’s what you require for the intermediate level:
Video and Audio Sources:
Multiple cameras and microphones.
An Encoder:
You can either go for software or hardware encoder. If you’re opting for a software encoder it’s recommended that you have a machine with nothing less than 8GB memory, and Intel Core i5 2.8 GHz, for quality streaming experience for the remote audience.
On the other hand, if you’re going for a hardware encoder, you won’t need a capture card and you’ll have to connect your video and audio sources directly to the hardware encoder.
With modern encoders, you’ll be able to take in different visor formats like DVI, XLR, HDMI, VGA, etc. And you’ll have to connect your encoder to your WiFi network as well to stream.
WiFi:
If your video source is delivering 1080p content quality (which the video sources at this level would most likely deliver), you need to ensure you have a 13 Mbps upload speed.
The Audience:
Your audience at the event venue needs to be aware that you’re live streaming this will help them understand their positioning and avoid movements that may distort capturing.
Speakers:
Speakers need to know what cameras they should focus on when speaking only to the remote audience, as well as what audio source is only for the remote audience.
Captions:
Recall those special intros that come up during live news telecasts?
They are not possible without using audio software that permits you to introduce overlays, desktop animations, passages, lyrics or captions that will boost viewer engagement. So you’ll need to get software that’ll help you with captioning.
Advanced Level
Setting up an advanced video and audio source for your event live stream is something you’d have to do if you want remote audiences to get highest quality viewership.
You have many options at this level, like virtual reality (VR) live streams, 360-degree cameras, multiple cameras, drone shots and a lot more. Producing VR content isn’t just for gaming anymore, as you can bring your remote audience into an immersive experience of your event.
Here are some of the requirements at this level:
Multiple Cameras:
Live streaming huge events requires that you have various camera types at different locations, for varied angle shots.
You can also introduce 360-degree cameras into the mix for 3D capturing of the event. For live 360, you’ll need to use a resolution of 1400p or 1260 and the highest possible bitrate you can stream at.
Another camera type introduction would be wireless cameras. They allow your operators to shoot better shots and get into places that wired cameras can’t go. And if you’re handling events at different venues regularly, you may not know how restrained you may be with wires at a new location.
With wireless cameras, you can get closer to the action with a better range of shots. However, it’s better to introduce just one or two wireless cameras into your production mix than turning the entire set to wireless cameras due to battery issues.
One- or Two-Way AV Team Communication:
When you’re dealing with multiple cameras and staff handling your live stream audiovisual sources, having a clear line of communication with your team is crucial.
Capturing the event from similar angles as well as producing the same shots from multiple cameras repeatedly bores the audience quickly.
Incorporating a one or two-way communication system into your AV workflow will allow you to direct your operators what to capture per time, instead of giving them permanent directives that can’t be enhanced based on valuable spontaneous moments.
To do this you can introduce a one-way communication channel that allows you to talk to camera operators without them talking back. Or a two-way communication channel that allows operators to give you feedback on your directives.
This is however all dependent on the venue, as a small hall may not be conducive for two way communications because it may distract the physical audience. On the other hand, a large hall would be perfect for two-way communication.
You can use communication hardware like clear coms, walkie-talkies with headsets, wireless headsets (this may not be the best option as battery power may be a challenge) based on the distance your AV team needs to cover.
Audio Mixers:
Getting amazing quality shots and scenes of your event for the remote audience is nothing if the sound quality is horrible. In basic setups, an external microphone connected to a camera may pass.
But when you’re running multiple audio sources, you’ll need a mixer to convert audio signals into live stream format as well as to have control over the tones and volumes of each of those audio sources.
Video Switcher:
With multiple cameras, you’ll need a video switcher to control the shots being captured. You’d also have to decide on the number of inputs needed, based on how many cameras are being used as well as other inputs such as graphics shown by speakers or support slides.
Speak to an Expert WiFi Consultant:
Unless you are well versed with the WiFi demands of live streaming, it will be beneficial to hire an expert WiFi consultant to assist you to assess your bandwidth needs for the particular venue.
The experts can review what you have on ground and give recommendations that will ensure you have enough bandwidth to cover every activity happening at the event and the audience size you are expecting. They will even help recommend the best service providers for the event location. And the bandwidth needed.
Contract WiFi Providers:
While it’s great to get a consultant to explore your options, it’s also necessary to know a bit of the option yourself and one of is temporary internet providers. These companies focus on offering temporary bandwidth for events. Their services can be ideal when the venue of the event makes traditional wireless unreliable, due to inconsistent connectivity or slow speeds.
Incorporate Streaming Services:
Certain live-stream services can negate types of equipment that you may want to use physically.
For instance, Westream offers live streaming services like editing, encoding, production, 360 degrees live streaming, live reply, etc. Such services ensure that the remote audience gets the best quality as professionals handle them.
Best Live Streaming Apps for Broadcasting an Event on Social Networks
Social media video marketing on networks such as Facebook, Twitter, and Instagram is rapidly gaining popularity among event planners, so much so that:

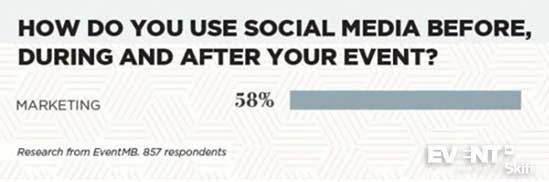
This is because of the increase in the awareness of how crucial social networks are for effective in marketing. In 2018, about 58% of marketers used social media for marketing before, during and after the event.
That’s not all:
With that said, live streaming your event on social platforms isn’t as complicated as you may think. In fact, 89% of event planners use social media to generate pre-event engagement, while 49% use it to engage attendees during the event.

There are different social media apps that you can use to live stream your event.
In this section, we will be examining the best social media live-streaming apps and how to live stream your event on each of them. All the apps are compatible with mobile phones and basic microphones and cameras and do not need any sophisticated equipment to function.
Let’s look at these apps:
How to Live Stream Using Facebook Live
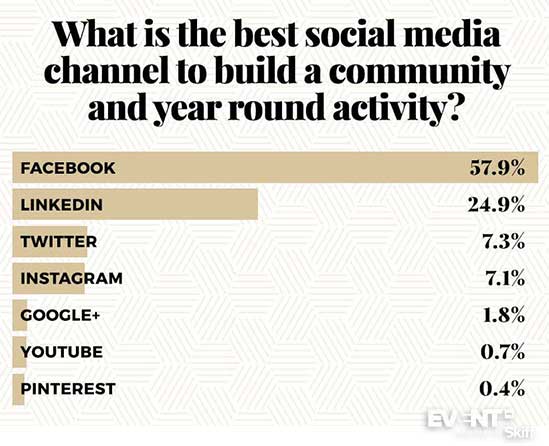
Facebook is used by 52% of event planners for promoting their events; this makes it the most popular social media channel in event marketing.
There’s more:
Initially, live streaming on Facebook was limited to only celebrities but it is now accessible to everybody.
Audiences can watch live streams on Facebook Live via either their Facebook app or the web. Viewers can also make real-time comments while the live video is on and they share the video with their friends and to the public.
Despite the ease of accessibility of Facebook Live to the target audience, it still has some limitations. One of the biggest challenges of using Facebook Live is that it lacks the features and qualities of a professional live stream video as Facebook Live is mainly good for streaming short videos.
This challenge can, however, be overcome by combining Facebook Live with live stream services like Livestream because the additional Livestream features will add production value to your live event broadcasts.
Streaming on Facebook Live is very simple and even a novice can do it. To stream your event live, do the following:
STEP 1.
For mobile users, on the Facebook app, tap the “live video” icon to update your status.
If you are using a desktop computer, at the top of the newsfeed, click the “live video” icon.
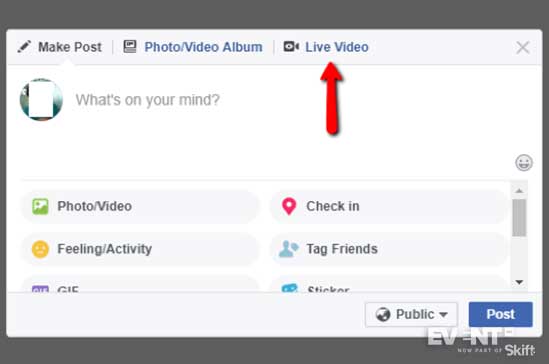
When you do this you’ll activate camera access, and your camera will be activated on another window.

STEP 2.
Write a description for your video
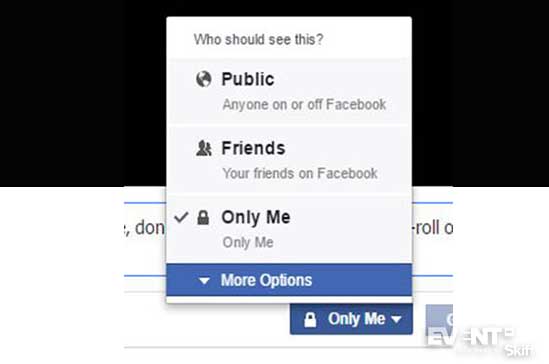
STEP 3.
Set your Audience. You can choose to make it live with your friends, a particular group of friends or to the public.
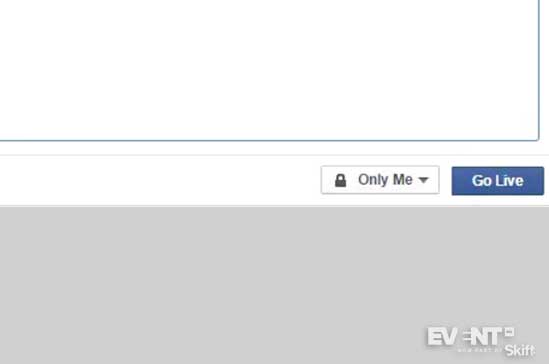
STEP 4.
Click “Go Live”. Your event will go live immediately and will be visible to your target audience.
To get a more professional stream or to stream to your website, you can incorporate Livestream into your Facebook Live. Livestream has a built-in Facebook Live tool. All you need to do to activate it is to press the “on” button in your settings.
How to Live Stream your event on Livestream
Livestream is among the best broadcasting apps available in the market, which is compatible with both Android and iOS operating systems.
Livestream is often used for professional purposes and gives users personalized analytics and tracking for their events.
After logging in to your account, take the following steps:
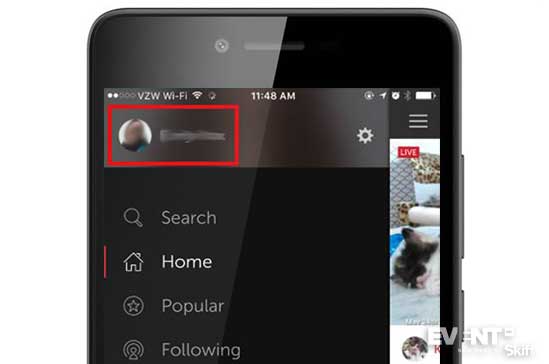
STEP 1.
Tap your name in the navigation menu to open your profile
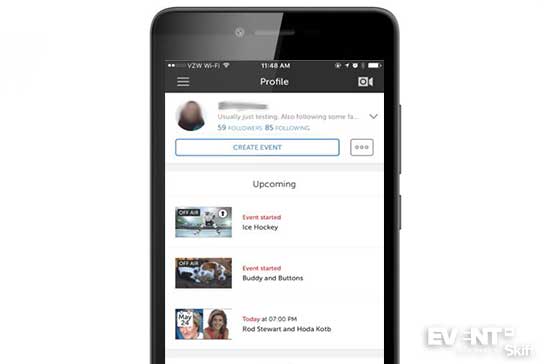
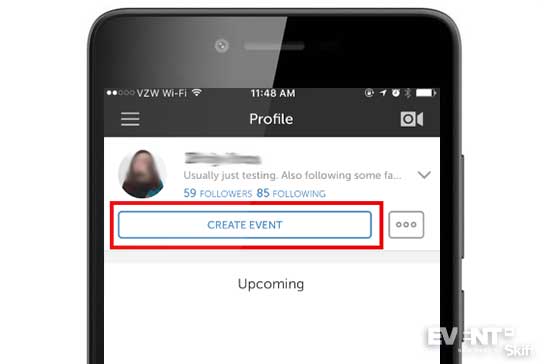
STEP 2.
Click “create event’ to create a new event page
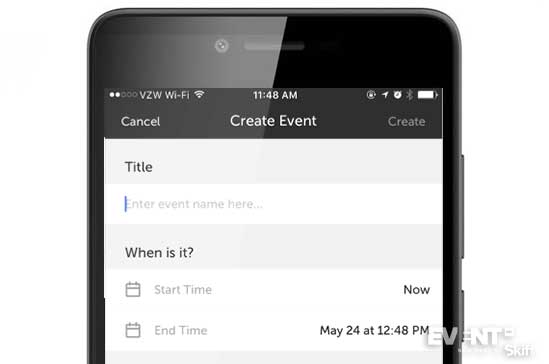
STEP 3.
Add a description of the event
STEP 4.
Click the red “Go Live” button. Your camera will open. Alternatively, you can simply tap the camera icon in the upper-right section of your screen. Once you tap the button, you will start streaming.
STEP 5.
When you are done with your video, press the red square icon to end the streaming.
At the end of the stream, the app saves the video automatically. However, you can delete it permanently after the event.
It’s also a great idea to add tags and category to your live event as well as turn on your location to make it discoverable. While the video is on, you can share it by clicking on the share option directly below the camera, post texts, and upload pictures to give more information about the event to your viewers.
You can also enable comments on the live stream.
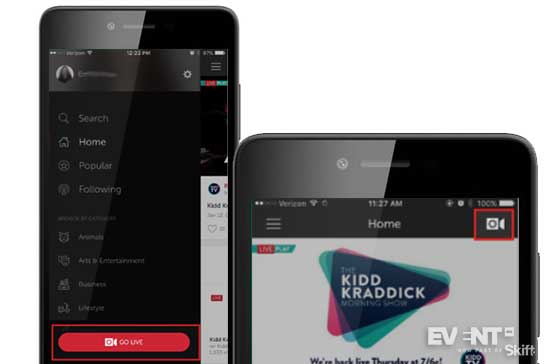
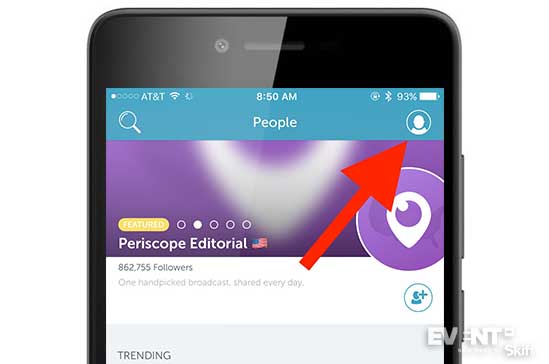
How to Stream Events on Periscope
Periscope is the pioneer live streaming event app for social networks and it still ranks as one of the best streaming apps.
It is easy to use and compatible with iOS and Android operating system. With this app, you can see the people viewing your video and follow them, limit video access to just your friends or the entire public, share live videos to Twitter, and activate location and comments.
You’ll be able to stream on Periscope via the Periscope Producer (this is a test program designed for streamers and content creators) or through a mobile device. To stream using a mobile device, do the following:
STEP 1.
Open the Periscope app on your mobile device
STEP 2.
Click on the “Broadcast” button. Once you click on the button, your video will go live.
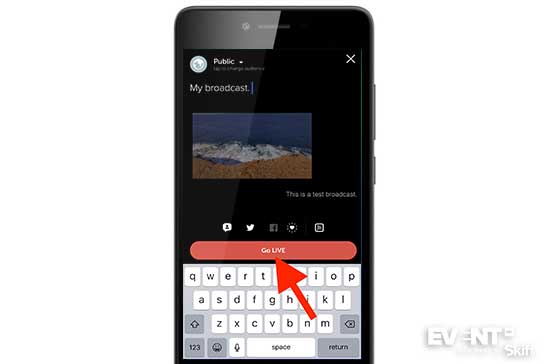
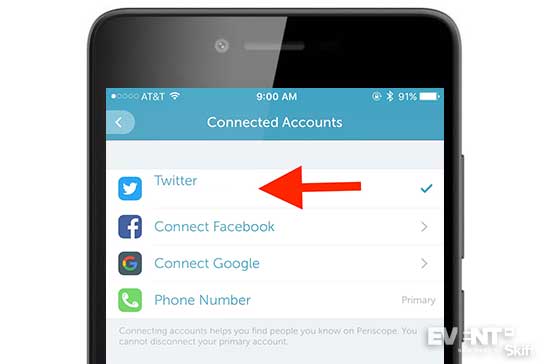
With the help of Periscope Producer, you can run live Twitter stream for events or Livestream to Periscope once you sync your periscope account with them. This connection allows you to stream to different destinations simultaneously.
How to Live Stream on YouTube Live
Streaming your events on YouTube is easy and you can do it using a desktop computer or a mobile device.
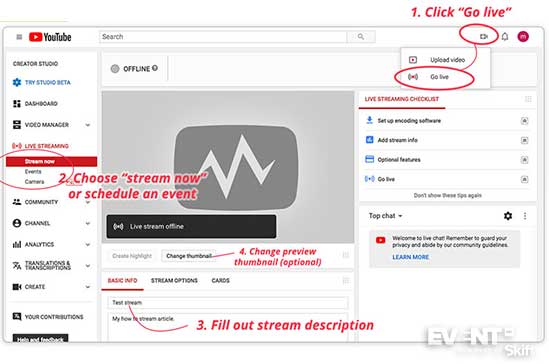
STEP 1.
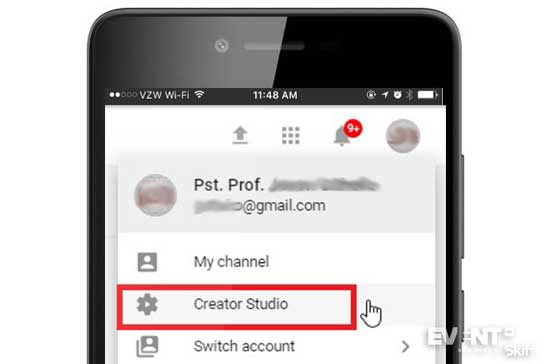
Log into your YouTube account and click on your profile picture
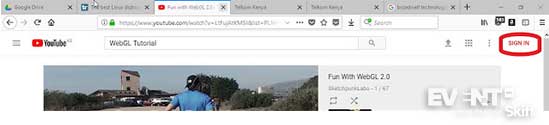
STEP 2.
Click on “Creator Studio Tools”
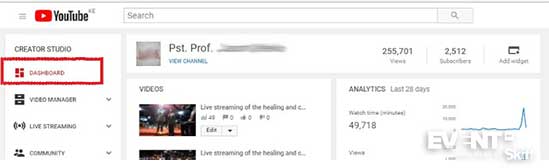
STEP 3.
Click “Live Streaming“. At this point, you will be given three live stream options; Mobile, Events, and Stream Now.
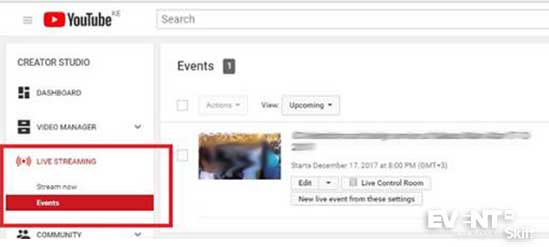
If you choose the “Stream Now” option, select YouTube as a producer and your video will go live immediately.
To announce your event before you go live, select the “Events” option.
Keep in mind that to live stream using the YouTube mobile option, you need to have more than one hundred subscribers on your channel.
How to Live Twitter Stream your Events
Twitter allows users to stream live videos directly from the app on iOS and Android operating system.
Live streaming on Twitter is possible via Periscope. The Periscope app is however not needed (you don’t need to download it) before streaming live events. The streaming video displays within the app and you can determine if just your friends or the public can view the video.
Viewers can also interact with the video while it’s ongoing by using the heart emoji.
To be able to stream your event live on Twitter, your Twitter account must be public, profiles set to private can’t stream live videos.
Protected accounts usually have a lock icon by their username. To switch your account from the public, go to “Settings and Privacy” and disable “protect your tweet”.
To begin the live Twitter stream of your events, take the following steps :
STEP 1.
Open the Twitter app on your device

STEP 2.
Click on the camera icon
STEP 3.
Tap live
STEP 4.
Click “Add location”. Adding location will make your live video visible to both users of the Periscope and Twitter app.
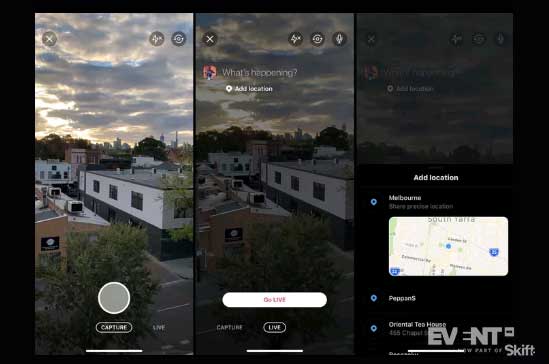
STEP 5.
Click “What’s happening”, this will enable you to type in the title of the live video or a description/ message to your viewers.
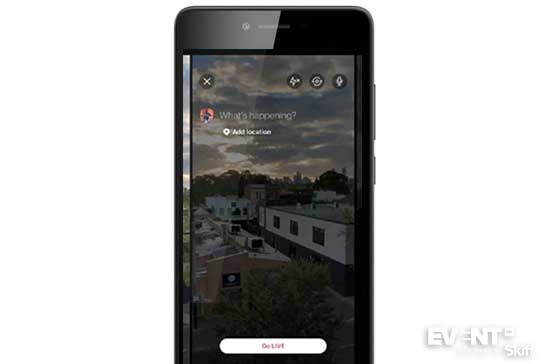
STEP 6.
Click “Go Live” your event will begin to stream live.
To see who is viewing your live video, you can tap on the icon at the lower right section of the app; and encourage them to share the video and to follow you.
STEP 7.
To end your live stream, go to the top left corner of the app and tap “Stop”
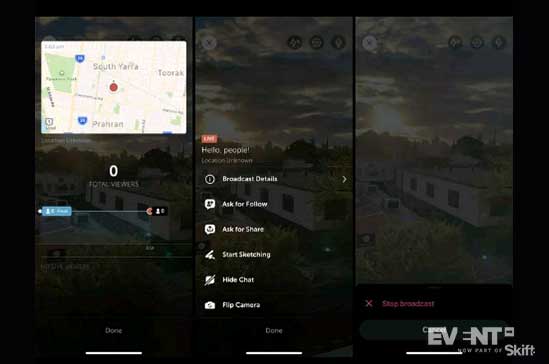
STEP 8.
Tap “Stop broadcast” on the confirmation option that pops up.
Your live stream saves automatically on Twitter once the live broadcast is over. You’ll also be able to edit the video, and you can change the title as well as the start and endpoint of the video by clicking “Edit Broadcast”.
When you are done with the editing click “Save Changes“.
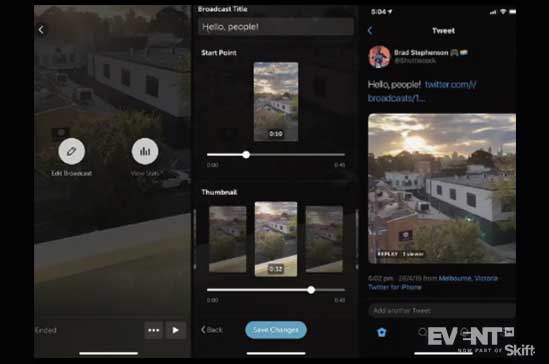
The video can be deleted as well and once you delete a video it will be deleted on both Twitter and Periscope app.
How to Live Stream your Event on Ustream
Ustream enables you to broadcast live interactive videos. It has very professional post-event editing features that will amaze you.
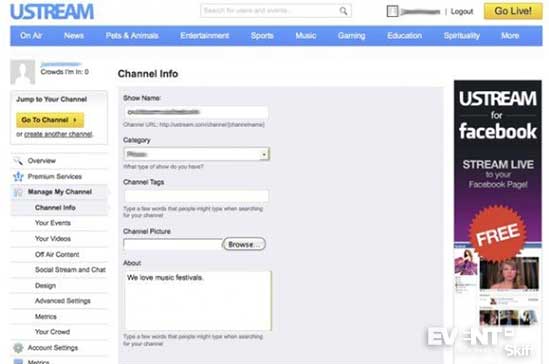
The best way to broadcast on Ustream is through your channel. To create your own Ustream channel, you need to sign-up to Ustream.
After signing up, you will be redirected to the “Channel Info” section of “Manage My Channels” and will be able to customize your channel with tags, pictures, design of the channel, the privacy settings, etc.
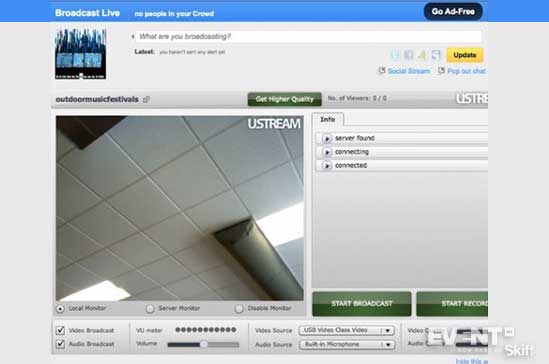
To set up your live video stream after setting up your channel, take the following steps:
STEP 1.
Click on the “Go Live” button.
When you do this, a new window will open with a prompt asking you to allow Ustream to have access to your microphone and camera.
STEP 2.
Tap “Allow“, your broadcast will open.
STEP 3.
To start your live stream, Click “Start Broadcast”
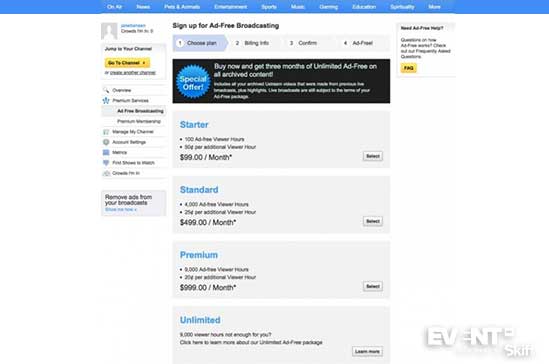
Ads will be displayed on your video channel but you can bypass this by upgrading to a paid premium account.
How to Use Instagram Live Stories
The Instagram live story feature is embedded in the Instagram app. It is very easy to use and requires little or no technical expertise.
While your live broadcast is going on, viewers can like and comment on it. You can share videos as long as one hour but once the live broadcast is over the videos will disappear.
When you start streaming your event on Instagram, your followers will receive a notification, or a live tag will appear on your Instagram story and your audience can click and watch.
To start live streaming your event on Instagram live Stories take these simple steps:
STEP 1.
Open your Instagram app
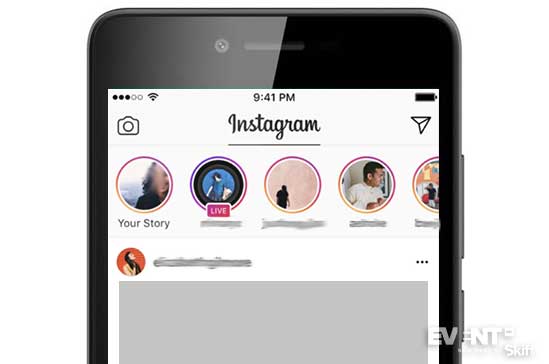
STEP 2.
When the app opens, swipe over to the right
STEP 3.
Click on the “Live” option. Your event will go live immediately.
IN CONCLUSION
Live streaming can help you reach audiences unable to attend your event and when done correctly, with captivating shots, quality sound, and video, the success rate of your event could climb even higher.
Following the steps in this piece, you’ll be able to set up and run your live stream on your chosen platform effortlessly regardless of how you want it done, basic, intermediate or advanced.
What’s your favorite live streaming application?