
Part 1 of this series of posts gave an overview of what’s involved in implementing participant-driven breakouts in Zoom. Part 2 explains how to prepare for The Three Questions, and Part 3 explains how to run them using Zoom breakout rooms. Please read them before diving into this post! In this post (Part 4) I’ll cover Step #2 — how to process the participant information uncovered in Step #1 to create an optimum conference program. Part 5, the last in this series explains how to run your peer conference using Zoom breakout rooms.
Creating and convening your conference program group
By the end of The Three Questions (see Part 3), your scribed Google document contains a rich list of your participants’ desired and needed topics, issues, and current challenges. Now it’s time for a small conference program group of conference leaders and subject matter experts to use participants’ answers to the Second Question to create an optimum conference program. (Part 1 lays out options for your participants while this is going on.)
Make sure your small group contains someone from each Three Questions breakout group. These people can identify participants in their group who have the expertise, experience, or interest in leading or facilitating the sessions you choose.
The conference program group can meet in a variety of ways. Perhaps participants are listening to a presentation while your small group meets in a Zoom breakout room. If attendees are taking a meal break, you can use the current Zoom meeting, and restrict attendance to the conference program group. Or you can simply set up a separate Zoom meeting for the small group to hash out the upcoming conference program.
Building your optimum conference program
The small conference program group needs a tool to review and organize the topics that participants have requested and suggested.
Tools for in-person meetings
At in-person meetings, I use the process Post It! for Programs, described in Chapter 22 of my book Event Crowdsourcing. Read Chapter 22 to understand the detailed process I summarize in this post. (You may find Chapter 21, Peer Session Selection and Sign-up useful too.)
The small group starts with a wall of participants’ topics, written on large sticky notes. We clean up, cluster, and consolidate the topics, moving notes around and rewriting them as needed. The small group reviews and rates the results, and chooses the most relevant topics. Finally, we find leaders and/or facilitators for these peer sessions and schedule them into an optimum conference program.
Tools for online meetings
Two tools that provide the above functions for online meetings are Miro and Mural. You can read a useful comparison of their features and user interface here. Miro has a free limited version, and Mural offers a free limited-time introductory plan. It’s worth upgrading to a paid plan for either of these products if you expect to use them regularly.
In this post, I’ll outline how to use Miro to collaborate remotely with your small group. I don’t know Mural as well, but you should be able to use it in a similar fashion. Even though the basic concepts can be quickly grasped, both Miro and Mural provide a rich variety of functionality. So you and your small group members should practice using them. Before the conference, give small group members a link to a “playground” Miro board where they can freely explore Miro’s frames, sticky notes, and tools.
Importing participant topics into Miro
Miro has a simple, though slightly obscure, way to import the topics from your Google doc into separate sticky notes. If you try the obvious approach —bulk copy all the topics and paste them directly into Miro — they’ll end up in a single block of text. Instead, open any spreadsheet program (e.g. Excel, Numbers, or Google Sheets) and paste the topics into the top left-hand cell. They will fill the leftmost column, with one topic per row. Now copy all these cells and paste them into Miro. Each topic will be added to a new sticky note, nicely laid out in a grid.
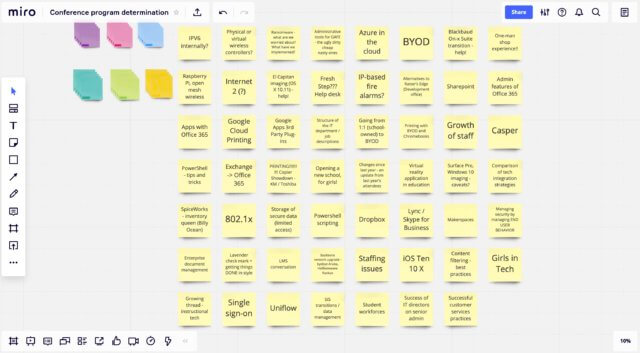
Here’s an example: the topic list shown in Part 3…
…turned into a set of Miro sticky notes via the above copy-paste-copy-paste process.
Process participant information: cleaning up and clustering topics
Once you’ve created a board of imported topics, copy it to a new board for the small group to work on. (In Miro, click on the name of the board in the top left-hand corner and click “Duplicate”.) This keeps the original topics available for reference if needed.
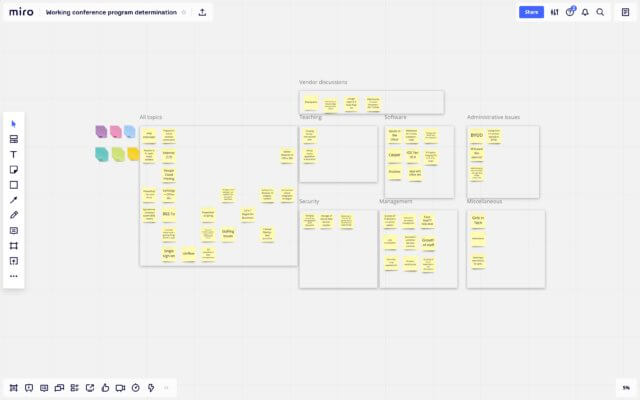
The next task is to review the topics and check that they’re clearly expressed. If a topic is unclear, rewrite the note or discard it. As you review the notes, notice themes and create a Miro frame for each one, plus a Miscellaneous frame for isolated ideas. Cluster topics by dragging sticky notes out of the original grid into the appropriate frames, as shown below.
The small group should have agreed on conventions for working on the topic board and identifying and collecting sticky notes that eventually become peer session topics. There are many ways to do this. For example, you can:
- Use a specific sticky note color to indicate a potential or definite peer session topic. (You can change the color of an existing note from its context menu.)
- Create a separate frame for topics that will become peer sessions.
- Create frames or a space on the board for topics and frames that have been reviewed and are not going to be incorporated into the conference program.
Process participant information to determine the peer conference program
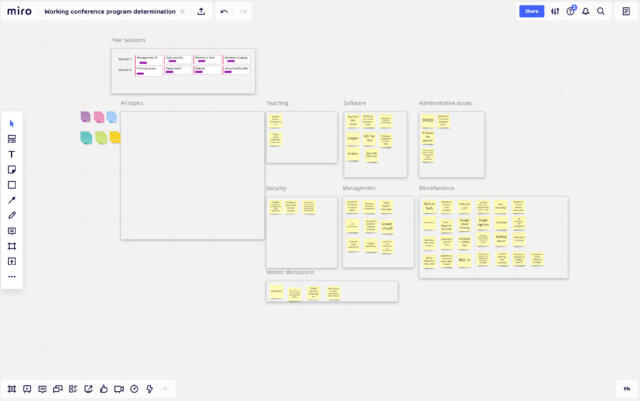
Use the process described in Chapter 22 of my book Event Crowdsourcing to determine the peer sessions you will offer, pick leaders and/or facilitators for each session, and schedule sessions into your conference program time slots. As you decide on each session, drag its sticky note into a “Peer Sessions” frame, as shown below.
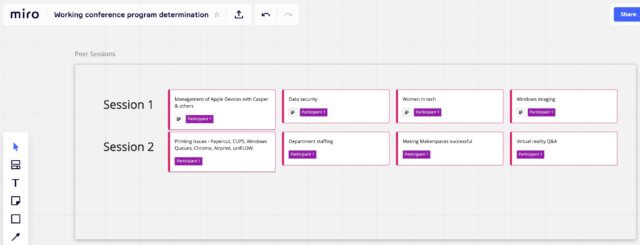
In Miro, you can switch the type of a sticky note to a card. I recommend doing this for your chosen peer session sticky notes, since Miro cards provide you with a structured way to add data, like the names of session leaders, a long description, etc.
Distributing your peer conference schedule
As soon as you’ve created your peer conference schedule, distribute it appropriately to all participants. You could publish the schedule on your conference website, email it as a Google Doc, or supply it as a link in Zoom chat. Remember to also inform session leaders when their sessions will be held, and be available to answer any questions they might have. I also recommend distributing a version of the introductory handouts for peer sessions that are included in two of my books (Appendices 4 & 5 in Conferences That Work, or Appendix 6 in Event Crowdsourcing).
All that remains is to prepare for and run your online peer conference, which I’ll cover in the final post of this series.
Conclusion
First, a big thank you to the super-creative Liz Lathan of Haute Dokimazo for sharing with me how she collects and begins to process participant information online. Liz figured out how to use Mural to do this — the Miro process I’ve described above mirrors hers.
So far, in the first four posts of this series, I’ve:
- provided a brief recap of the benefits of peer conferences;
- given a big-picture overview of how you can hold one online;
- explained how to prepare to run The Three Questions online in Zoom;
- covered how to run The Three Questions online in Zoom; and
- how to create an optimum conference program from participants’ responses (this post).
The last post (Part 5) describes how to run your peer conference program using Zoom breakout rooms.
Check this blog for future posts on implementing participant-driven breakouts in Zoom. To ensure you don’t miss the rest of the series, subscribe.